eCommerce sellers need to be able to track their webshops performance to optimize it for conversions and sales. Google Analytics 4 is a powerful tool that can help you do that.
Google Analytics 4 is a major update that reflects the evolution of the modern internet and apps.
In this post, we’ll show you how to set up Google Analytics 4 on Magento 2, so you can start tracking your site’s traffic, data streams, and performance data.
Why implement Google Analytics 4 (GA4) on Magento 2?
The eCommerce world was recently taken aback by an announcement made by Google. According to Google, the older version, i.e., Google Analytics Universal, which supported only the web channel, will stop processing data from July 1, 2023. Google recently launched the most advanced version of its universal analytics tool, i.e., Google Analytics 4 (GA4).
Universal Analytics tags have many benefits for websites, but it is being retired to make way for GA4. Universal Analytics is replaced with a newer and better version of google analytics property, GA4.
Integrating Google Analytics 4 with Magento 2 is essential for collecting more detailed and meaningful insights about web data stream, visitors, and their behavior.
How to add Google Analytics 4 in Magento
To embed the GA 4 in your Magento store, follow this algorithm:
Step 1: Develop Your Google Tag Manager (GTM) Account & Container
Create a new Google Analytics 4 property in your Google Analytics account. It is recommended that you use the GA4 Setup Assistant that Google provides. If you face any issues, you can go through online tutorials to learn how to create your GTM account.
Step 2: Install the Google Tag Manager 2 Extension
There are various GTM extensions available for you to install & proceed with the next step. However, choosing the one that efficiently delivers precise business needs is essential. Simply perform a Google search and review the features sections to determine which matches your business needs. It’s simple to install them; post-installation, you need to connect the GTM with the extension. Most extensions available out there follow automated steps for establishing this connection.
Step 3: Establish a Connection between the GTM container & Magento GTM Extension
Perform the following steps to connect the GTM container with the installed extension.
- Open the GTM container
- Navigate to the GTM ID number and click on it
- Further, copy the GTM ID number from the code
- Go to the Magento GTM extension and fill in the copied GTM ID number by navigating to the following: Stores > Configuration > Sales > Google API > Google Tag Manager section
- The next step is to save the configuration to connect the GTM with the online Magento store.
Step 4: Develop a GA4 Configuration Tag in GTM
Perform the following steps to successfully create a GA4 configuration tag in the GTM.
- Open the GTM container
- Navigate to the Tags section and click over the “New” button
- You will land on the new section with the “Tag configuration Space option.”
- Click the “Tag Configuration Space” icon to open “Tag Types.”
- This will open the new section on the right-hand side of the page
- Select the GA4 configuration tag types
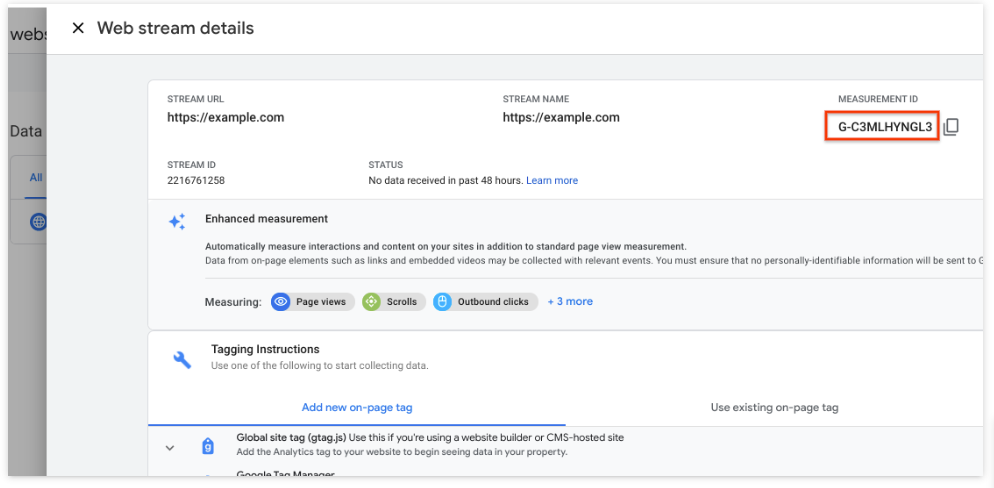
- Now you need to enter the GA4 Measurement ID number. You can find the Measurement ID in the same place as the GA4 tracking code.
- Navigate and click on the “triggering section.”
- Further, select the trigger “All pages.”
- Now place the name of the tag as “GA4 Configuration” and save it with a simple click
This connects the Google Analytics property with the online Magento store & Google Tag Manager.
Step 5: Check Connection in the GTM Preview Mode
It’s time to determine whether everything works perfectly fine or needs improvement. Simply go to the Google Analytics GA4 property and determine whether you’re receiving traffic. It may take some time before GA4 starts displaying the results. However, you can click the “preview” button in the GTM container to test the established connection. Further, copy and paste your Magento store URL and click on the “Connect” option.
This will open the eCommerce store in a new tab.
- Navigate to the GA4 property and select Configure report
- Open the DebugView interface.
- This will open a page_view event
This means your connection has been established and working properly.

Enhanced Ecommerce GA4 Implementation For Magento 2 Via Google Tag Manager
By following the guide above, you’ll have implemented a simple Google Analytics 4 tracking integration for your Magento 2 store, which will measure the following website data:
- Page views
- Scrolls
- Site search
- Outbound clicks
- Video Engagement
- File downloads
Connect with us, Today!
At Nethues, you can hire a Magento 2 developer to help implement Google Analytics 4, ensure its security, and more. We have a team of skilled professionals who make the process easier and seamless. Our team of skilled professionals has years of experience implementing Google Analytics 4.
We hope you’ll find this guide helpful to set up Google Analytics 4 using Google Tag Manager, or you can connect with us and hire a Magento 2 developer.

2500+
Project Launched
20+
Years of Experience
250+
Skilled Professionals
60+
Days of Free Support
Frequently Asked Questions (FAQs)
Q1. What is the difference between Google Universal Analytics and Google Analytics 4?
Google Analytics is a web analytics service offered by Google that tracks and reports website traffic. Google Analytics 4 is the latest version of Google Analytics. It uses a machine learning algorithm to identify data patterns and predict future behavior automatically. GA4 also offers new features such as conversion tracking, cross-device reporting, and support for AMP pages. While GA4 is still in beta, it is available to all users.
Q2. How long does it take for Google Analytics 4 to work?
Google Analytics 4 can take up to 24-48 hours to collect and set up the data from your website. However, the data might sometimes take longer to be processed and appear, depending on the size and complexity.
While waiting, you can verify your tracking code is doing its job by checking your real-time reports and debugging view or looking at your website source code. Contact Google Analytics support for help troubleshooting any potential issues with your account.
Q3. How do I know which version of Google Analytics I have?
Firstly, open your Google Analytics account. If you have access to your Google Analytics account, you can look there to see which version you are running. To do this, log into your Google Analytics account and click on all accounts in the top left-hand corner.
Q4. How do I send test traffic in Google Analytics?
- Log in to your analytics account.
- From the left panel, click on admin. Click on admin.
- Under the property panel, click on .Js tracking info and then tracking code. Click on the tracking code.
- Click on the send test traffic button. Click send traffic button.
Q5. What language does Google Analytics use?
Google Analytics experts use JavaScript to transmit information to Googles servers about site visitors.